Your time is precious. We got you.
You want to spend your time on validation and not on technology specifics, during a proof of concept period. You want minimum effort for (de-)commissioning and maintenance, during roll–out and normal operation. This is well understood by ioTracker and hence they deliver industry-grade, easy-to-manage LoRaWAN® devices.
Via this blog, you will learn how easy-to-manage ioTracker really is.
Ready? Go! 🚀
Say, you need to:
- monitor electricity pylons’s subsidence,
- safeguard personnel with a panic button with localisation,
- ensure temperature was within limits of transported live tissue,
- track & trace assets,
- measure temperature, humidity, air-pressure, light, or
- do something exotic.
How would you approach that? Well, easy. Read on.
Prerequisites
The points below needed and covered in this blog.
The following is needed as well, but not covered in this blog as great guides exist already.
- A LoRaWAN Network Server such as LORIOT. Check their quick start guide.
- An IoT platform or application service to which LORIOT outputs the data for further processing or storage of the raw LoRaWAN data. Many IoT platforms exist. Here are some great platforms, all integrated with LORIOT:
- Datacake
- Ubidots
- Akenza
- LORIOT supports many other IoT platforms and application outputs
- Working on a platform which does not yet have ioTracker support built-in? Get your ioTracker payload decoder script from their GitHub.
Deploying your #LoRaWAN sensors can seem complicated but in reality, it just takes a few clicks. Minimum effort for decommissioning and maintenance is the way to go. How do you achieve that? Easy. Configure @ioTracker with @LORIOT.
click to tweet.
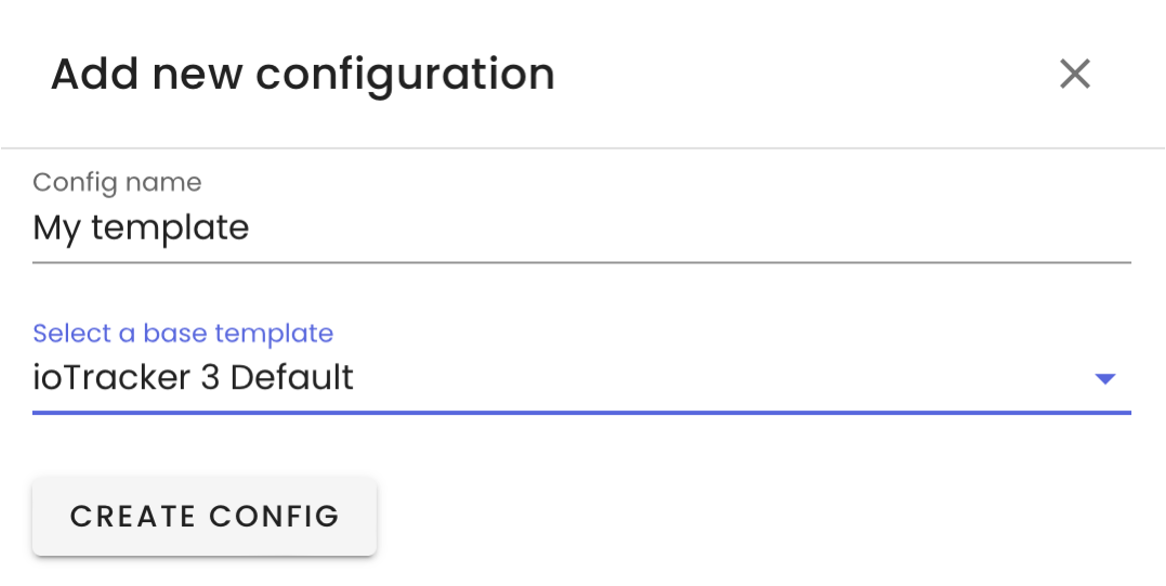
Step 1 - Create your ioTracker configuration
No more headaches when creating device configurations or downlinks. No more thinking about bits, bytes and endianness. ioTracker created the easiest tool ever to view and create your custom ioTracker configuration. And the best thing: the configuration will be used in step 2 as well! Let’s create your own configuration.
- On your (mobile) device, navigate to https://configurator.iotracker.io/list
- Login using your ioTracker console credentials.
- Click the “+” button on the bottom left.
- Give your configuration a name.
- Select the base template as a starting point.
- Back in the template list, (search for and) click on your newly created ioTracker configuration template
- Tailor the configurations to your needs. Upon changes, an orange pencil icon in the menu will be shown.
- If you would like to undo the changes, click the arrow-back icon in the top right of each feature page.
- Click “View Changes” in the bottom right to review the changes.
- Click “Save changes”
Your custom ioTracker configuration template is now stored (just for you) and available via the ioTracker Configurator Android app as well. So, let’s go and apply it!
Step 2 - Apply your ioTracker configuration
You are almost there. Only a few clicks left to get your ioTracker configured to your needs.
- Ensure the Android phone has Bluetooth enabled.
- Download and install ioTracker Configurator Android app and grant it Bluetooth permissions.
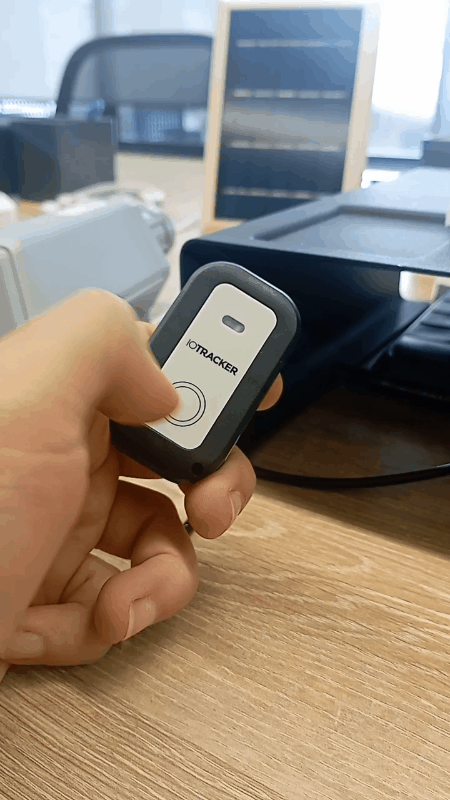
- Press and hold the ioTracker 3 button until its LED starts flashing blue, then briefly release and press briefly again to confirm activating Bluetooth. (Credits to Ubidots for the button-press gif.)
- Open the ioTracker Configurator Android app, click “LOGIN” and enter the ioTracker console account credentials as obtained upon ioTracker device purchase.
- Select your ioTracker in the app. If none are listed, press the circular, blue search button on the bottom right.
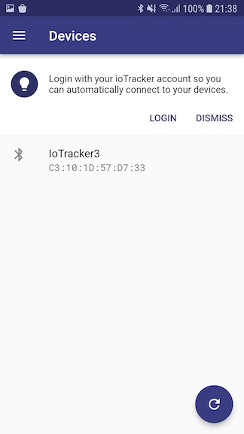
- Tap on the listed ioTracker device and you’ll be logged in to your ioTracker, automatically! ioTracker highly values the security and privacy of your data, each ioTracker has its unique passwords and does not store your custom passwords. Hence, if you have changed the ioTracker password previously, then auto-login does not work
- You’re now logged in to the ioTracker. 😎
- From the main menu, you can fully manage your ioTracker. For the purpose of this blog, the focus will be on ensuring the LoRaWAN keys are properly set and a specific ioTracker configuration template is loaded.
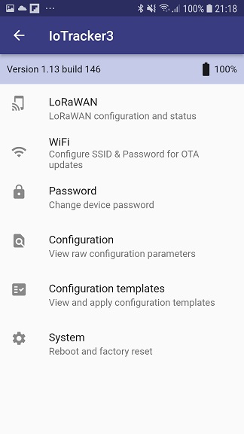
- Click LoRaWAN and then the pencil/edit button on the top right
- Make sure the DevEUI, AppEUI, AppKey and LoRaWAN Region correspond with the LoRaWAN device as (to-be) configured in LORIOT. A ioTracker reboot is required to apply the new LoRaWAN configuration.
- Then, navigate back to the main menu and click Configuration templates.
- Then, here comes the magic.
Simply select the ioTracker configuration you need, click Apply configuration, Apply again to confirm and then…

- The ioTracker will reboot to apply the loaded configurations and the connection with the app will be automatically closed.
- Your ioTracker is ready to go!
- Example: when you use the Datacake IoT platform, you should see the ioTracker data flowing in (see screenshot below), corresponding to the configurations which you have created and applied in Step 1 and 2.
Conclusion
How easy was that?
- LORIOT LoRaWAN Network Server set-up; just a few clicks.
- ioTracker tailored configuration creation and application; just a few clicks.
- IoT platform integration; just a few clicks.